Posts

what are the main causes of bad request 400 in java jsp web project

in a Java JSP web project, an HTTP status code 400 (Bad Request) typically indicates that the server cannot process the request due to a client error. Here are some of the main causes of a 400 Bad Request: 1. Invalid URL Structure If the request URL does not conform to the expected structure, such as missing a required part of the path or having an incorrect query string format, the server may respond with a 400 error. 2. Missing or Invalid Parameters When a request requires certain parameters to be present, either as part of the URL or in the request body, and these are missing or invalid, the server might return a 400 status code. 3. Malformed JSON/XML If the request body contains JSON or XML data, and that data is not correctly formatted, the server may be unable to parse it and thus return a 400 error. 4. Invalid Headers Certain operations may require specific headers to be set in the request. If these headers are missing or have invalid values, it can result in a bad request. 5. D

Difference between the session.getAttribute() and session.getValue() : methods in JSP

  In Java Servlet and JSP (JavaServer Pages) development,   session.getAttribute()   and   session.getValue()   are methods used to retrieve data from a user's   HttpSession . However, there are some differences between the two, primarily related to the version of the Servlet API in which they were used and their deprecation status. Here are the key differences: API Version : session.getAttribute() : This method is part of the Servlet API from version 2.1 onwards. It is the recommended way to retrieve session attributes in modern Java web applications. session.getValue() : This method was part of the older Servlet API (version 2.0 and earlier) and has been deprecated since Servlet API 2.1. Deprecation : session.getAttribute() : This method is not deprecated and is the current standard for accessing session attributes. session.getValue() : This method is deprecated . The use of deprecated methods is discouraged as they may be removed in future versions of the API. Return Type :

How to setup first project in android studio with jetpack compose

Image
Download and Install Android Studio : If you haven't already, download and install the latest version of Android Studio, as it comes with built-in support for Jetpack Compose. Create a New Project : Open Android Studio. On the welcome screen, click on "Start a new Android Studio project" or go to "File" > "New" > "New Project" if you have another project open. Choose a Project Template : Select the "Empty Compose Activity" template, which is specifically designed for Jetpack Compose projects. This will set up a project with a minimal Compose setup. Click "Next". Configure Your Project : Enter a "Name" for your project. Choose the "Save location" for your project files. Select a "Package name" which is usually in the format of  com.example.myapp . Select the "Language" as " Kotlin ". Choose the "Minimum API level". Jetpack Compose requires a minimum API level

How Create First Project in Android Studio

Image
   Create First Project in Android Studio with  Java Open Android Studio and select "Start a new Android Studio project" from the welcome screen. Choose "Empty Activity" and click "Next". Give your project a name and choose a location to save it. Select the minimum SDK version you want to support. It's recommended to choose a version that covers a large percentage of devices. Click "Finish" and wait for Android Studio to create your project. Once the project is created, you will see the project structure on the left-hand side of the screen. Open the "MainActivity.java" file and you will see the code for your first activity. Run the project by clicking the green "Run" button at the top of the screen or by pressing "Shift + F10". Choose a device or emulator to run the app on and click "OK". Wait for the app to build and run on the device or emulator. Congratulations! You have successfully created and run

Jetpack Compose

Image
  Jetpack Compose is a modern UI  toolkit for Android that simplifies the process of building UI components. It is based on the declarative programming model, which means that you describe the UI components you want to create and the framework takes care of the rest. To use Jetpack Compose, you need to have the latest version of Android Studio installed on your computer. Once you have installed Android Studio, create a new project and select the option to include the latest version of Jetpack Compose. After creating the project, you can start building your UI components using the Compose APIs. The Compose APIs are designed to be simple and easy to use, so you can create UI components quickly and efficiently. You can use the Compose APIs to create UI components such as buttons, text fields, images, and more. To create a UI component, you simply define its properties and behavior using the Compose APIs. Once you have created your UI components, you can add them to your app's layout

Kotlin Multiplatform

Image
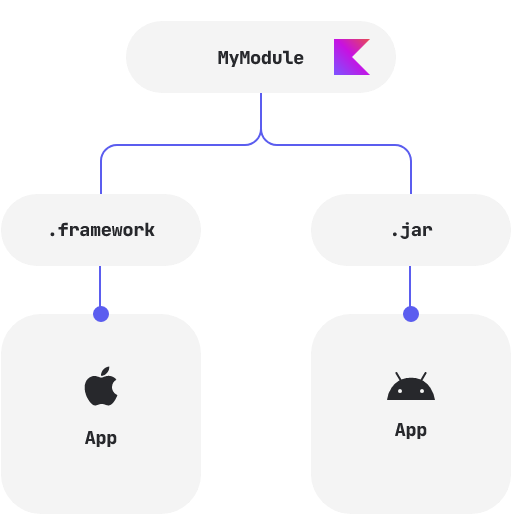
Kotlin Multiplatform is a technology that allows developers to write code in Kotlin that can be shared and used across multiple platforms such as Android, iOS, and web. It allows developers to write code once and use it on multiple platforms, reducing the amount of time and effort required to develop applications for different platforms. Kotlin Multiplatform provides a set of tools and libraries that enable developers to write platform-specific code and share common code between platforms. This approach allows developers to maintain a single codebase for their application, reducing the complexity of managing multiple codebases. One of the key benefits of Kotlin Multiplatform is that it allows developers to reuse existing Kotlin code and libraries. This means that developers can leverage existing libraries and tools to build applications for multiple platforms, reducing the amount of time and effort required to develop applications from scratch. Kotlin Multiplatform also provides a set